Skip
Tacview is a free third party progam that takes all the (flight) information and records it, to allow you to replay it at a later date. Tacview excels at debriefing your flights and allowing you to up your flight skills and become an even better fighter by reviewing what went wrong and what went right: not only does it record your own flight data, it also records that of any other unit in the session, be it AI or player.
The starter version of Tacview is free and offers a substantial improvement of understanding what happened during your fights and flights, so we heavily recommend you install Tacview and give it a go! TacView works similar to any module in DCS, in that it hooks into DCS and runs without worry in the background: aside from DCS is also compatible with X-Plane, Falcon 4 (BMS), IL-2 and a handful of other flight simulators.
The way that TacView works when installed / hooked into DCS is similar to using a module: TacView continuously records the values of all units in the game (in the background): speed, orientation, acceleration, etcetera. It not only records this for player operated units, but also for the AI units and even for any weaponry (such as guided missiles or dumb bombs). This means that TacView can record and replay to you who shot a missile, where it hit or why it missed (with any weapon in the game).
This data is normally already send to your PC, but it is not always made available to you (i.e. you cannot always see it) and it does not normally save this data: thus the performance impact TacView has on your system is minimal, as it only saves this data. The data that TacView saves is all put into a so-called Track File (or log), which can be saved in one of many extensions. The most common ones are .acmi, .txt.acmi, and .vhs), but a great many more files can be loaded into the TacView program and be viewed in a concise manner (without a lot of unnecessary flair or flashy graphics, but with all the detail).
This TacView track or log can also be generated by replaying a flight inside the DCS replay tool, if you have saved the recording of this flight. Simply replaying it inside the DCS replay tool should automatically generate a corresponding Tacview track / log: this also allows you to replay flights from servers where the data export was outright disabled. Please note that due to the inaccuracies of the DCS replay tool such generated TacView Tracks may not accurately represent the flight performed.
As we said above, the starter version of Tacview is free to obtain and contains a good toolkit for any self-teaching pilot to improve and hone their skills. It offers a clear and concise overview of the battle taken place, whilst at the same time offering a wealth of information you would have otherwise never seen. Such information can be the airspeed and altitude of both friendly and enemy flights, but also targets they engaged, what sort of weaponry they released and the engagement ranges of SAM sites.
The purchasable TacView Standard and Advanced editions offer some advanced functionality, but most of this functionality is rarely needed by the standard pilot. Functionality offered in these editions includes more advanced telemetry support (being able to indicate systems such as the gear position and the radar display; showing which target was being locked), as well as support for online debriefing which allows groups to do their debriefings together. Most importantly of course is that these paid versions offer support to the developer(s) of this amazing software!
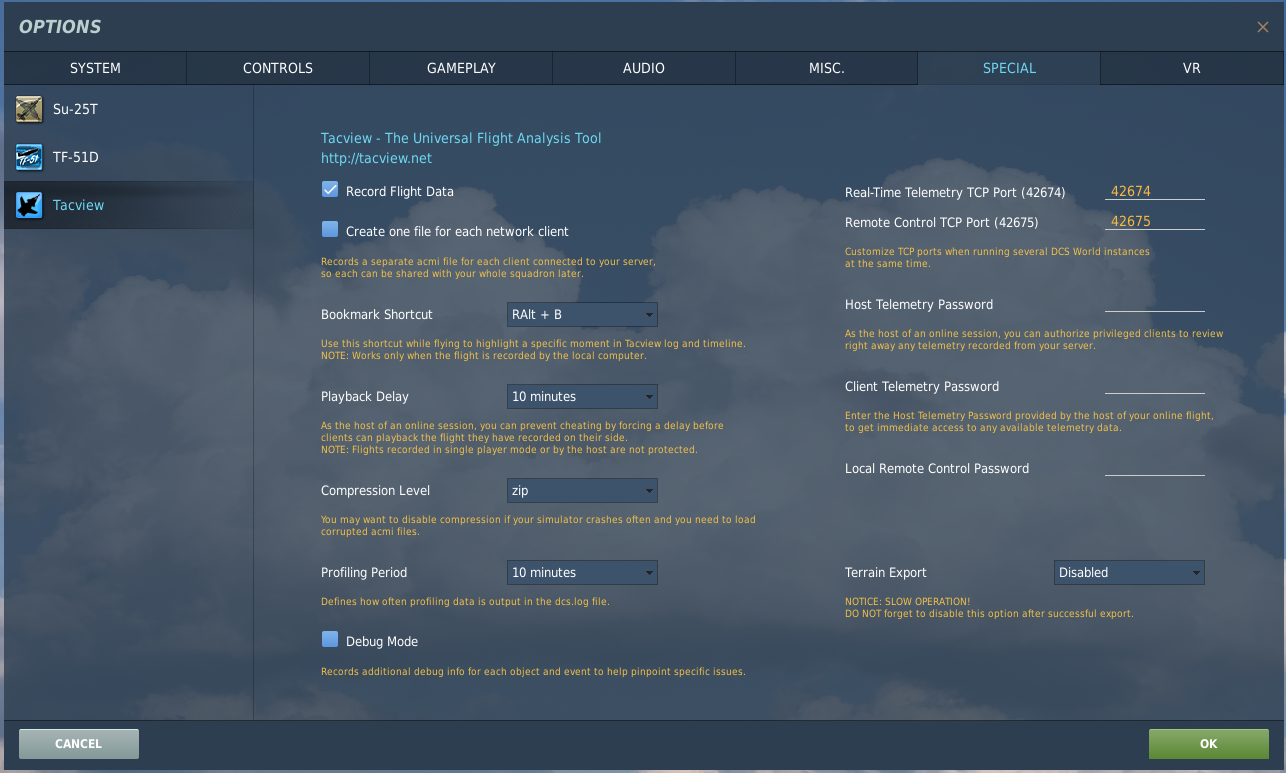
Installing Tacview is easy and painless, as you can just obtain the .exe installer from their website (listed in the sidebar). Running the .exe should allow TacView to automatically find your DCS (or BMS) install, after which it sets itself up and you should be ready to go! This also means Tacview get its own settings page within the DCS settings (just like any module), from which you can adjust and tweak the various options offered: such (enabled by default) as Tacview automatically recording the flights you perform in DCS. You can also alter settings like the Bookmark keybind (to mark important events), the compression level (to reduce file sizes) and the profiling period (how often data is written log file).
There is a little more effort required into getting familiar with the user interface and setting up a multiplayer environments to debrief your entire flight at once, but Tacview's DCS installation guide is a great help for more difficult tasks, such as how to import terrain into Tacview.
Some people have expressed their reservations about using the data export, as the information stream could technically be used to view enemy positions in real-time (and thus cheat). To prevent this, TacView can allow server hosts to set a delay so that the information only becomes available after a set amount of time (lets say 5 minutes).
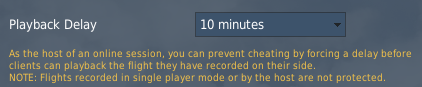
The configurable delay (which can be set in the Tacview settings within the DCS settings) allow you as a server host to prevent people from livestreaming their data to their Tacview client and using it to cheat, whilst allowing people to export the Tacview data with a delay to use for their own evaluation and feedback. This option is server authoritative, meaning that if the server host does not have Tacview installed / enabled the playback delay will automatically be set to the default 10 minutes delay: this only works if the server host has not outright disabled the data export, out of misguided fear of TacView cheaters.
Note that any playback delay enforced by the the server does require you to remain this long after doing your final landing, as otherwise the final 10 minutes (or whatever amount of minutes the delay is set to) will be cut off from your recording. This could just be you flying back to your airfield / carrier, but it could also be you getting shot down!
Without having a flight recording loaded up the interface of Tacview looks quite bare, but this changes as soon as you load up a recorded flight recording. You can load up a flight recording by clicking the top left USB icon and select a flight recording from a previous flight you have performed: files are saved by default in the path (flight recording save path can be changed within Tacview / DCS settings)
\My Documents\Tacview\
DCS Flight recordings are of the .acmi format and are compressed into a .zip by default to save on hard drive storage space; if the DCS settings Tacview section you can alter the compression desired for the .acmi files.
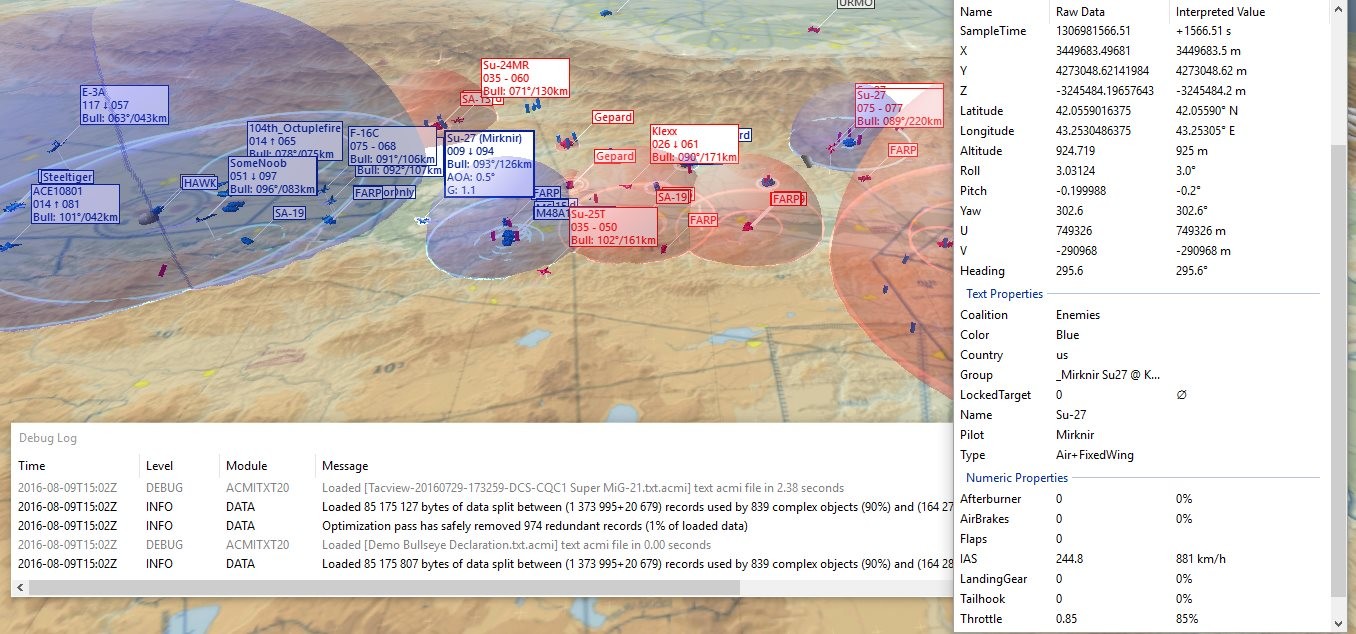
The TacView interface as a whole is highly customizable, as you can choose to display a ton of different variables. You can even customize your own charts that display parameters such as energy versus altitude, speed versus G-force, etcetera. However, lets first go over the (default) UI. Buttons [1] through [7] are your standard run-of-the-mill file buttons that allow you to open different tracks, show different windows, set options, and change properties of items within the 3D representation.
As you can see from the image and table above, (a small part of the) left side of the program is dedicated to the (raw) data display, whilst (the majority of) the right side is dedicated solely to a clean 3D representation of the data. Perhaps the most critical buttons in this screen are buttons [8] and [11]: these select the contacts we want to spectate, for which TacView will automatically create the relationship data between these contacts.
For example, we could set [8] to be our own airplane, with (11) being our ground target: it would then automatically show a (relationship) line between these contacts [8] and [11], with data such as distance and aspect between them. Button [10] can be used to alter the view of the relationship (between 'centered' and 'look at target').
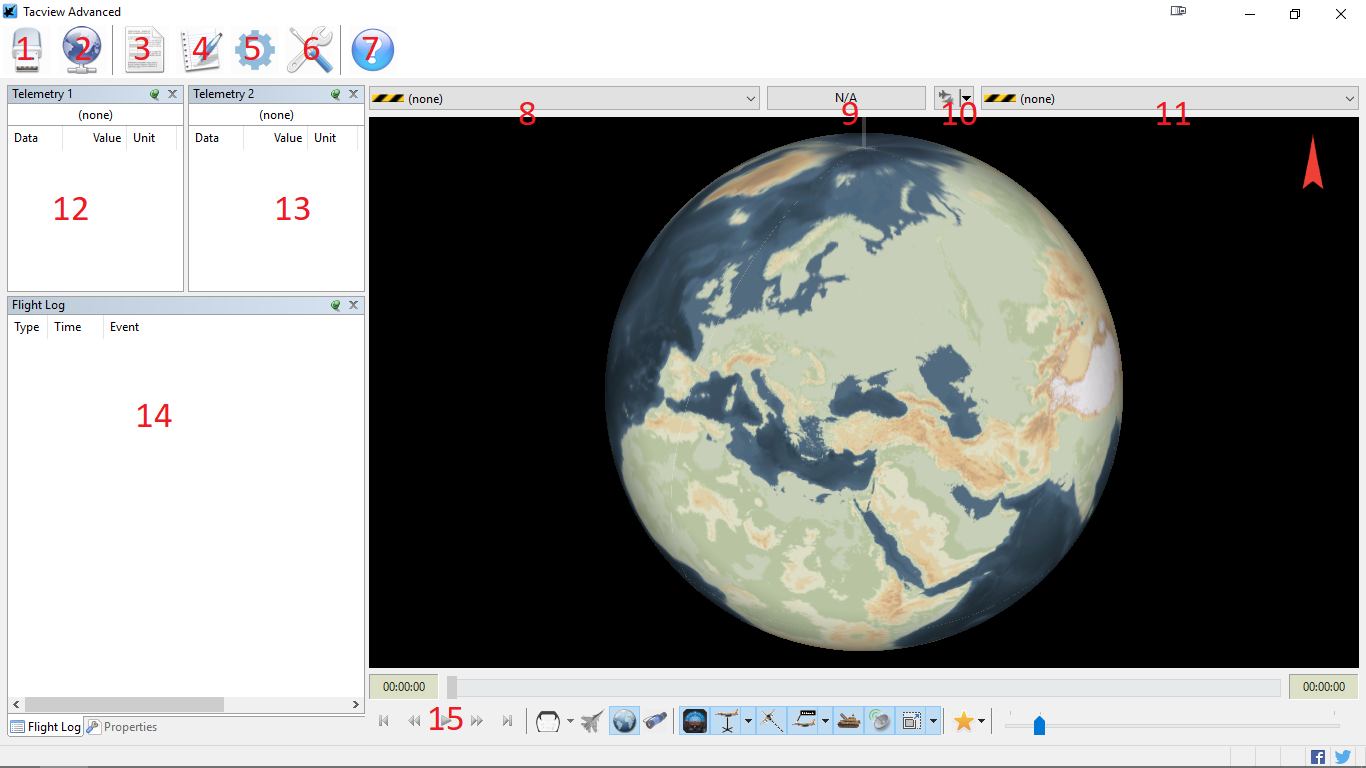
What sort of relationship data it shows can be adjusted by button [9], where you can choose from a plethora of relationship options:
Windows [12], [13] and [14] show the numerical data that is behind the 3D representation on the right: [12] and [13] show the data of respectively the contacts selected by buttons [8] and [11]. The windows [12][13] show a relatively sanitized representation of the data: you can also go into menu [3] and bring up the raw telemetry data from both contacts. Window [14] shows a flight log or list of all events that happened within your flight: every crash, weapon release and kill is shown in this log.

The main feature in the TacView program however has to be the 3D representation on the right side, as his shows all units within the flight taken with a concise yet detailed interface. Most critical information about the various aircraft such as airspeed and altitude is shown in a box next to the aircraft (as shown in the image here). This allows you to easily identify threats and targets within the TacView program, which in turns should allow for some easier debriefing.
The green line as seen here is the relationship line described earlier (linking two contacts together and showing relative information), but we can also see the SAM Range indicators in the background: these are in the form of the (red) spheres and show the SAM threat envelope (i.e. the area in which they pose a threat / can shoot missiles at you). This too is a great method of conveying this information onto pilots during debriefing.
Inside the DCS settings we can set a number options for our installed TacView (module). The main option is of course the tick mark to 'record flight data', which should be ticked by default to allow any flight that you take part into be recorded (provided the server has not disabled the data export). It is not required to have the TacView program (the .exe) running in the background to record and save these flight (tracks / logs). To alter where Tacview saves these tracks / logs you will need to go into the program however: the option can be found under the TacView program settings, but we will come back to this later.